JavaScript Notebook

Users can write JavaScript code in an intuitive, clean editor interface provided by each cell in the notebook. To execute the code, they have multiple options: pressing Ctrl + Enter runs the code in the current cell without changing focus, making it ideal for testing and quick edits. Pressing Shift + Enter not only runs the code but also navigates to the next cell. If no cell exists below the current one, a new cell is automatically created and focused, allowing for smooth, uninterrupted coding — much like traditional computational notebooks. Additionally, each cell features an execute icon (highlighted in yellow) at the bottom-left corner, which users can click to run the code manually. Upon execution, the output is displayed directly beneath the code cell, enabling immediate feedback and streamlined development.
Each code cell also includes a delete icon (highlighted in red) that allows users to remove the cell entirely from the notebook interface. This makes it easy to manage and customize the notebook layout.
Load Packages
External libraries (such as D3.js, Chart.js, or Three.js) can be dynamically loaded using CDN links via a helper like loadCDNScripts, enabling rich visualizations and advanced scripting directly in the browser—no server or build tools required.
The user can also get the output as a chart. To achieve this, additional code must be added to the existing code block. When appending the chart element, use thisDiv.appendChild(...) instead of document.body.appendChild(...) to ensure the chart is rendered within the notebook output area. Below is an example:
// Sample Code to Display a Chart

// Load external JS libraries dynamically from a CDN using loadCDNScripts
await loadCDNScripts([
  { url: "https://cdn.jsdelivr.net/npm/lodash/lodash.min.js", globalVar: "_" },
  { url: "https://cdn.jsdelivr.net/npm/dayjs/dayjs.min.js", globalVar: "dayjs" },
  { url: "https://cdn.jsdelivr.net/npm/chart.js", globalVar: "Chart" }
]);

// Create a canvas for rendering the chart
const canvas = document.createElement("canvas");
const ctx = canvas.getContext("2d");
new Chart(ctx, {
  type: "bar",
  data: {
    labels: ["Red", "Blue", "Yellow"],
    datasets: [{
      label: "Votes",
      data: [12, 19, 3],
      backgroundColor: ["red", "blue", "yellow"]
    }]
  }
});


// If you can access the current output container,
// you do not need to use `document.body.appendChild(canvas)`.
// Just use:
thisDiv.appendChild(canvas);
You can dynamically load external CSS stylesheets (e.g., Bootstrap, Tailwind, Font Awesome) using the helper function loadCDNStylesheets. This allows you to apply consistent and responsive styles in your notebook without bundling local CSS files.
// Sample code for load external CSS using CDN

// Load external CSS dynamically from a CDN using loadCDNStylesheets
await loadCDNStylesheets([
  { url: "https://cdn.jsdelivr.net/npm/bootstrap@5.3.0/dist/css/bootstrap.min.css" }
]);
thisDiv.appendChild(...) — DOM Element Insertion
The thisDiv.appendChild(...) method is used to insert a DOM element as the last child of thisDiv. This is the recommended way to add elements dynamically in JavaScript because it avoids the risks and limitations associated with using innerHTML.
By using appendChild(...), you are adding an actual DOM node, not an HTML string, which ensures:
Proper parsing and rendering by the browser
Better security (no risk of script injection)
Retention of event listeners and properties on the element
This method is clean, safe, and consistent with modern DOM manipulation practices.
Example
const button = document.createElement("button");
button.textContent = "Click Me";
thisDiv.appendChild(button);
Notebook Management

Users can manage multiple JavaScript notebooks through a simple and intuitive panel.
Users can create new notebooks by clicking the add notebook icon (highlighted in yellow), allowing them to work on different projects or examples. To delete a selected notebook, users can click the delete icon (also highlighted in yellow), helping keep the workspace clean and organized.
The notebook list on the left enables quick switching between different notebooks with a single click.
Header Controls

Users can click the menu icon (highlighted in red) to toggle the left sidebar. This helps to either hide or show the list of available notebooks and manage workspace space.
Clicking the “Hide Code” button (highlighted in yellow) will collapse all code cells and display only the chart outputs. This is useful for a clean presentation or reviewing results without distractions.
Adding a New Cell
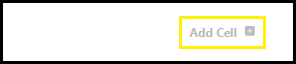
Users can add a new cell to the cell container by clicking the “Add Cell” button, which is located at the bottom-right corner of the cell container section.